This is my first week of exploring the world of motion design. Let’s dive right in!
Reading & Writing: Intro & Chapter One
This week I read the introduction and first chapter of the book Animated Storytelling: Simple Steps for Creating Animation & Motion Graphics by Liz Blazer.
The introduction instilled the idea that “being intentional about storytelling is the key to success,” no matter the type of animation you are doing. Both animation, which is typically considered to be in teh school of filmmaking entailing character-driven sorties, and motion design, which focuses on branding and content promotion, follow the same fundamental principles.
One of the main principles of any type of animation is the process of creation. The first chapter explains the first step of creating motion designs: pre-production. Before starting your project it is vital to plan as much as you can to save time, money, and headaches.
The first part of pre-production is Concept Development. During this phase you conduct a creative brief (either with yourself or with a client) to outline the who, what, how, when (being as specific as possible), and why of your project. Next you need to map out your big idea by doing a brain-dump of everything you feel about the idea behind the project then circling the thoughts that are most compelling to you. Finally you “hone your pitch” of the idea by starting out with a larger elevator pitch that outlines the tone, plot, and theme then narrowing it down to a tagline that sums up the idea in a few words.
The next phase of pre-production is Previsualization. This is where you narrow down the look and feel of the project by looking to outside references for inspiration, experimenting with different styles while letting your creativity go wild, and opening up to the idea of changing up your initial plot based on your design.
The final phase of pre-production is Asset Building. This is the most simple, but likely most time-consuming, part of the process. During this you create an organization system for all of your assets as you gather them; character designs, backgrounds, fonts, sound effects, ect.
Next week I will be exploring the next steps in creating motion graphics, stay tuned to hear more!
Research to Inform: Animated GIFs
For my research this module the aim was to find examples of fun, interesting, and effective GIFs. I used Pinterest, Reddit, Tumblr, and Dribble to find these neat animations.

One of the keywords I first looked for when researching was Avatar: The Last Airbender – not only because I am re-watching the series right now and remembering that it is in fact the best television show to have aired ever (and that is a fact) but because of how great the animation is in that show. The fight scenes are creative and beautifully done by hand-drawn animation, just like the GIF above done by a fan. Check out this animation analysis video for some cool details and facts if you love the show!

Nowadays when you hear “GIF” you automatically think of “reaction”. GIFs have been incorporated into seemingly every app out there as a way to express emotion or leave a quick comment. I chose this one because of the way they used a series of photos (or more likely a video) to create the movement of the shiba. They also added in some tweening and onion-skinning for the text, worry lines, and sweat drops, which are a cute addition.

This GIF is a cute and light-feeling animation. The faded colors, crayon-like style, and cute font work together to make this a delight to look at.
This GIF is probably my favorite from this bunch. The style is cute and simple at first which gives happy, summery vibes – then BAM everything explodes, goes to nothing, and the cycle continues. I love the color palette and the fact that it is completely erased when the nothingness occurs. This stark change makes the animation all the more stunning.
This GIF is the least colorful, but most visually engaging. At first I thought that there was not a story behind this one (and there may not be an intentional one), but the fact that there is so much going on on so many screens mirrors today’s world. Every screen has a unique, interesting, and exciting pattern – but when taking a step back and looking at it all at once it can be quite overwhelming.
While I typically acclimate to more hand-drawn styles of animation, this one caught my eye. First of all, the color palette is fun and compelling. Second, I love the message this one conveys – it is very simple but bright and inspiring.
Create: My Own Animated GIFs
Method One: “Cut Out” Images
The first GIF I created was made from a series of images I took of one of my pullets who was very interested in what I was doing. This style of animating reminds me of sequences of cartoon characters bouncing around the screen or making different faces and I thought the expressions the chicken had matched that vibe.
I used Photoshop to create a layer with each image, cropping out everything but the head and neck then positioning it to match the base image (the one where her head is within her silhouette). I did have to use the eraser tool to clean up the edges, but overall I am proud of this curious chicken. I exported the GIF in both 64 and 128 color versions and to my surprise they look almost identical – if I wanted to optimize as much as I could, I would just post the 64 color version without any worries.


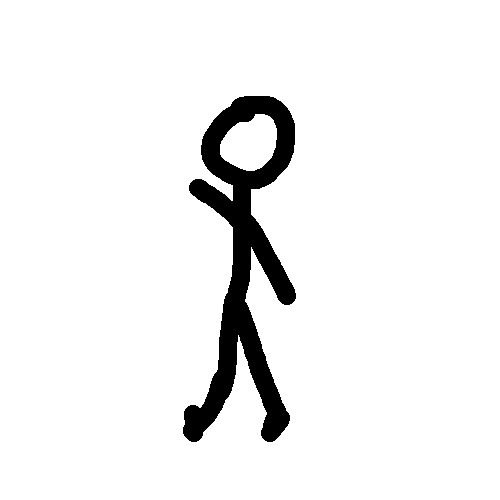
Method Two: Onion Skinning
For the next GIF I made a flip-book-style animation using onion skinning in Photoshop. Since I turned 21 during the pandemic and have yet to experience clubbing, I followed a video of a dancer frame-by-frame doing my best to translate her movements to stick-figure form. After making upwards of 75 frames, I am happy with how it turned out. To make it a little more rave-like I created a version where every 8 frames the color in a layer below changes.

Method Three: Onion Skinning and Rotoscoping
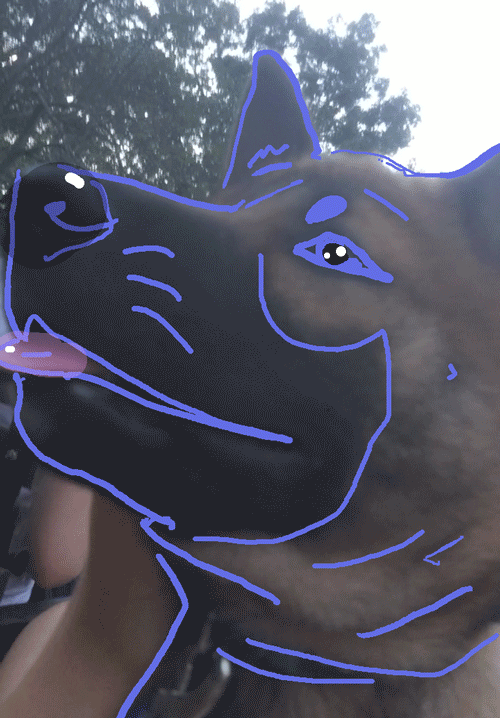
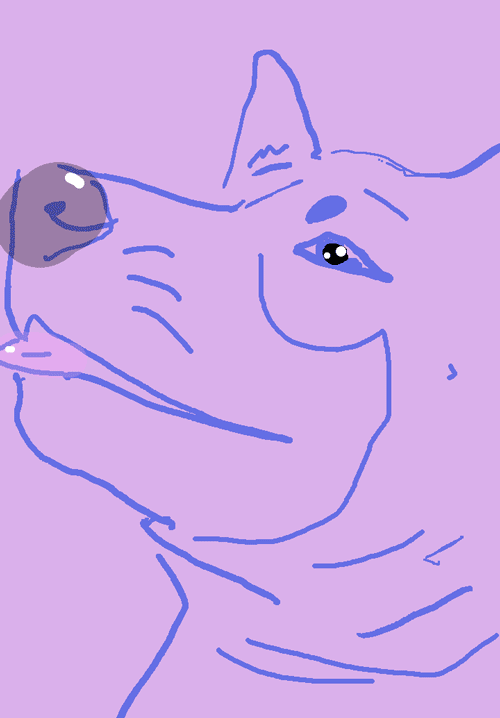
For my final GIF I wanted to practice rotoscoping since it is what I plan to do to create a short documentary. The subject matter for my practice is Mika, my shiba inu, making a cute head turn with her tongue sticking out. I first created a basic outline of her nose, ears, mouth, eyes, and eyebrows using onion-skinning and the original video as a guide. I then added a little color on her nose and tongue and some highlights to make the style more cute. Having a Wacom Cintiq definitely helped make the style look more authentic and hand-drawn since it has sensitivity detection.
I am excited to create more rotocopes, but these 13 or 14 frames took me about 4 hours to make. Time to bust out the coffee and lofi hip hop radio if I want to get through a whole 5-minute film without losing my marbles!
Next week I will be exploring and creating some cinemagraphs. Follow my blog for more posts about motion design!

One response to “Motion Design Module One: Animated GIFs”
[…] far Animated Storytelling by Liz Blazer has explained pre-production, storytelling, sound, and color for animation. In Chapter 8 she covers the final piece of the […]
LikeLike